Thursday, October 18, 2012

Handbag cake

I've always been a little afraid to attempt 3D cakes, what with the carving and balancing, but after finding this tutorial on the incredibly talented Jessicakes' blog, I thought I'd give it a go for my friend's daughter's 8th birthday!


Made the cake with red trim because it's her favourite colour (at the moment!) 


The "J" is for Jodee, the birthday girl (looks a little like half of the Chanel logo, maybe? No? lol)


The "fold" of the bag...I carved an indentation into the cake 
and smoothed with ganache before covering in fondant


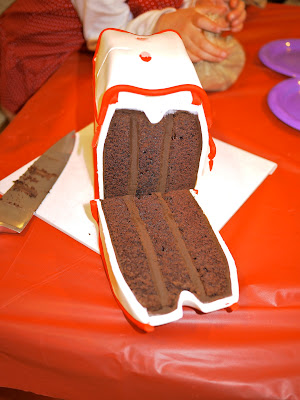
Cross-section of the cake!
It's actually not as dense as it looks, really yummy and moist


I have some happy snaps of the girls having the cake (which I'll put up when my SD card-reader eventually starts to work again - sigh! Technology!)

The girls were SO adorable though, some of them covered their eyes just as the birthday girl was about to cut the cake! "Don't cut it!", "I can't watch!", "No! Don't!" a couple of them yelled out; they were SO CUTE! But Jodee eventually sliced into it, and the girls dug in. YUM!


Tuesday, October 16, 2012

Peppa and Ellie

More cakery from the last few weeks...


Drippy chocolate ganache over a vanilla-bean frosted cake


Another elephant & spots-themed baby shower!
I matched the ellie's ears and the tiny spots to Rachael's baby shower invitation.


A rich, dense and moist carrot cake with cream cheese frosting.
Peppa Pig themed, for a little girl's 2nd birthday!


Thursday, October 4, 2012

Girly baby shower


Here's a little something I did recently for a girly baby shower :)


Girly pram cookies


Birdie cookies - these have got to be my most popular requests, they come in all sorts of colours!


Ruffle cake with hand-stamped & hand-written placard in edible ink.


These are actually buttercups (regular-sized cupcakes), 
for which I've tried a slight variation for the petal blooms


Don't forget, I'll be teaching BUTTERCREAM TECHNIQUES at Thread Den next Tuesday (9th October - click here for details) and MAKE YOUR OWN FONDANT OWL the following Tuesday (16th October). Classes include tips, handouts and a Kit of your own to take home with you!! What are you waiting for? ;)


Monday, October 1, 2012

Cookie monster cupcake tutorial

Here's a quick tutorial for the Cookie Monster cupcakes I did for my son's 5th birthday party - they're super easy, and all you need is this Grass/Hair piping tip.


I started with my super-moist choc fudge cupcake...


Since the cupcake's top was flat, I made a "mound" using a crank-handle palette knife 
to get a rounder shape for Cookie's head.


Start at the base and pull-up and out towards you. You'll get the hang of it pretty quick!


Furry cupcake!

These are white choc buttons you can get at any supermarket


Pipe some black buttercream using a No. 2 piping tip for the eyes

Pop the eyes in at an angle to make the all "googly"!!

Break a cookie in half and stuff it in!
Voila! Cookie monster!


Saturday, September 22, 2012

More than meets the eye

Well, then! Here's a quick recap of what I've been up to lately; I've been baking so much it's been hard to keep up with posting them on the blog! Good problem to have though, I reckon ;-)


A simple RVCC cake (red velvet & cream cheese) for a last minute order.


And last weekend was my son's 5th birthday!

He wanted this:


Um, no.

So I made this instead. I really wanted a black cake board for the backdrop, but didn't have enough black fondant, or even black construction paper in the house! In the end, I just settled for baking paper.


I'd printed out the logo, used it to cut out thick fondant pieces, 
and bevelled the edges for more dimension. Big thanks to hubby for the suggestion!


And for his kinder party the next day I made these cookie monster cupcakes that have been popping up on cake blogs everywhere! Here's my take:

Meee....wantt....COOOKIEEE!!
 I'll post a tutorial on it soon, it's super easy!


And since we're on the topic of Super heroes...


All the designs were supplied by the client; I believe the cake pops were from Sweet Cheeks Tasty Treats, and cake from Unique Creations by Angie.

And something different - a red and gold themed Oriental cupcake tower!

RVCC cake with encased in white chocolate ganache, and sprayed in edible gold paint


 Made the branches from chocolate fondant; hand-cut flowers and hearts.


The cake atop the tower - 200 RVCC babycups!

I loved making this cake, I think I really am at my happiest sitting at the bench molding fondant and creating things...anything fiddly that I can make with my (blessedly small) fingers I just love to do! Fine motor skills FTW!


Thursday, September 20, 2012

Feature

Ooh! So excited that we got another little mention in the latest SHOP 4 Kids magazine!


 And the lovely little write-up they had for me in the directory section...

Speaking of which, some exciting news! Those owls that you see featured? While I've written the tutorial to show you how to make your own owls, I've also been invited by Thread Den to teach them as part of the cupcake decorating classes they're running.

I'll be teaching two classes - one on buttercream techniques, and one on fondant. They're pretty hands-on and fun, and suit beginners, so come along and we'll have a ball! Dan, from Thread Den, will be listing the details shortly, but they'll be held over 2 evenings in October.

Also, I'll be hanging out with the kiddies this school holidays - yes we're having a Kids cupcake decorating class - and TEA PARTY! Suitable for kids 6 years and older, you can drop them off for an hour, wander around the lovely Brunswick St., then  pop back again to join us for delicious little cupcakes your kids have decorated with love. A lot of love. ;-)


Details can be found here:
http://www.threadden.com/_pages/kids_class_description/cake001.html

Well, then! Here's what I've been up to lately:

Monday, August 27, 2012

Bunting tutorial

This is a short mini-tutorial on how I made the cute bunting you saw here.

First you'll need the following materials. I basically used whatever scrap material had in my craft drawer.

I had a pretty printed cardboard box, twine, and some lacey doiley wrapping paper.
Also a 5-cent piece, cardstock, a pencil, double-sided tape, bamboo skewers
and craft scissors with a scalloped edge.


Here's what I did:
1.  Cut triangles out of the cardboard.
2.  Cut rectangles out of the lace wrapping paper with the craft scissors to get that frilled edge.
3.  Stick the triangle onto the lace with the double-sided tape.


4.  Next, trace the 5-cent piece onto the card stock, and cut tiny circles out.
5.  Use a pen to draw a pattern on the edge of each circle. Spell out the person's name, 1 letter per circle.
6.  Stick the circle onto the triangle piece.


7.  Measure out a long piece of twine, around the length of the diameter of your cake, and tie to the two 
     bamboo skewers.
8.  Lay each circle-triangle-rectangle piece in the correct order (front facing down), and stick the twine onto
     their backs.
9.  Flip up, and voila! You've got your bunting, now stick it into your cake!


In this variation, I had a long strip of the lace paper and stuck the triangles onto it, 
then cut in-between to create the gaps.

Crafty, eh?


Friday, August 24, 2012

Reebonz Roadshow

*This post has NOT been paid for nor endorsed by Reebonz.*

A couple of days ago, I had the privilege of supplying Babycups for the Reebonz Australia roadshow event at Melbourne Central.

They wanted Black and Gold themed ones, so I came up with a Black Velvet cake topped with Cream Cheese icing, and gold-dipped chocolate flakes. All FIVE HUNDRED of them which took me almost 2 whole days to prep and bake (and I still have 100 leftover which were "rejects"...anyone wanna come over and help me finish them up?!)

They had a beautiful marquee setup, with fresh cut fruit, champagne at the bar, our babycups, and mini macarons from Little Feat.


Black Velvet babycups with cream cheese icing and gold-dipped chocolate flakes.


I also took some happy snaps of the bags and the event: 


 The Reebonz Australia girls.


Hmmm...black & gold, just like my babycups. 
I'd have happily accepted this as payment!


I got a chance to hang around a little, and was really excited to overhear people people commenting about the cupcakes! Everyone seemed to enjoy them and were raving about the icing so I must be doing something right...a little bit of encouragement goes a long way!